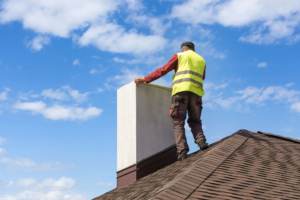
Chimney Repair Is Essential to the Safety and Longevity of Your Home
Baltimore Chimney Repair is essential to the safety and longevity of your chimney system. This isn’t a DIY job, so when you see signs of damage, contact a professional for help.
Repairing a damaged chimney can prevent larger problems down the line, including structural damage and leaks. Learn how to identify the most common chimney issues and get them repaired quickly.
Damaged mortar joints are one of the most common problems in brick walls and chimneys. These gaps between the bricks allow moisture to penetrate and cause further damage. This can lead to brick deterioration and even structural failure. To prevent these problems, it’s important to regularly inspect your masonry structure and repair any cracked or crumbling mortar immediately.
This process is called tuck-pointing, and it involves removing the old damaged mortar and replacing it with new mortar. It’s a relatively simple and inexpensive project that can be done by homeowners, but it’s important to follow proper safety procedures when using power tools. In addition, if the structure is historic, it’s best to hire a professional who has experience working with older masonry structures and knows how to preserve the integrity of the original construction.
Before starting the project, make sure that you’ve cleaned the work area thoroughly to remove any debris or dirt. Also, wear safety goggles and a dust mask to protect your eyes and respiratory system from the dust that will be created. Next, start by assessing the mortar joints to determine the extent of the damage. Use a chisel and hammer to chip away any loose or damaged pieces of mortar, making sure that you’re not damaging the surrounding bricks. Once all of the loose mortar is removed, you can start to clean out the damaged joints. Using a mortar rake or a hammer and cold chisel, carefully scrape out the existing mortar from the horizontal (bed) joints, taking care to not damage the bricks beneath. Then, use a brush or wire brush to clean out the vertical (head) joints. Once all of the damaged mortar is removed, flush the joints with a garden hose to make sure that all of the dust and debris has been removed.
Now that the work area has been cleaned, mix the new mortar according to the package instructions. After mixing, apply the new mortar to the gaps between the bricks with a trowel, filling each joint as you go. Once the new mortar is applied, use a jointing tool to smooth the joints. Then, cover the area with a damp cloth or plastic sheet to keep the newly applied mortar from drying too quickly and cracking.
Cracked Crown
A dental crown is a tooth-shaped cap that fits over a damaged, decayed, or weakened tooth. It is an excellent restoration option for teeth that would otherwise be untreatable due to severe injury or damage. While most crowns are able to last for more than a decade, they can break or crack due to physical injury, poor dental health, or just normal wear and tear. When a crown breaks, it exposes the tooth to bacteria and decay. It can also worsen the condition of the surrounding teeth.
If a crown is cracked, it should be repaired by your dentist as soon as possible. The longer you wait, the more likely it is that bacteria will penetrate the crack and cause an infection. In addition, the cracked tooth will become more sensitive to hot or cold temperatures, making it uncomfortable.
Depending on the extent of the fracture, a crown may be repairable or might need to be replaced. Often, a minor crack in the crown can be fixed using dental bonding, a quick and effective technique that allows the dentist to smoothen and reshape the damaged surface of the tooth.
This method uses a tooth-colored resin to rebuild the structure of the crown, eliminating the jagged edges. It requires only one dental appointment, and it is an ideal solution for small imperfections that don’t compromise the integrity of the crown.
The dentist will remove the broken piece of the crown and clean the tooth and the surrounding area. If the crack extends to the root of the tooth, a root canal may be needed to treat or prevent an infection. Once the crack is treated, a new crown will be placed over the tooth, and the dentist will cement it into place.
A cracked crown should be repaired as soon as possible to reduce the chances of bacterial infection and other complications. If a crown has come off, try not to swallow it. If you can see it, try to catch it before it falls off on its own. If you can’t, seek medical attention immediately.
Degradation
There are many causes of chimney deterioration, but the one that leads to the most serious problems is moisture. The presence of water in a chimney can result in damage to the flue liner, rusting metal components, and structural deterioration.
Moisture infiltration also creates conditions that allow for the growth of moss, mildew, and fungus, which can further weaken and discolor masonry. Ultimately, if left untreated, deterioration can lead to chimney collapse.
A number of factors can contribute to a chimney’s deterioration, including age, improper construction, and poor maintenance. A chimney that is not properly constructed or built for its purpose may experience drafting issues that lead to a buildup of creosote, and a flue liner that can crack, corrode, or deteriorate over time. Chimneys that are exposed to the elements for extended periods of time, as well as chimneys with a faulty cap, can experience more rapid deterioration.
Cracked bricks and mortar are a common sign of deterioration. Over time, cracks in masonry can become eroded by rainwater or by heat from burning fossil fuels, causing the mortar to break down. Once the mortar is compromised, the underlying bricks are exposed to the elements and can deteriorate as well.
As a general rule, older chimneys are more predisposed to deterioration than newer ones. When old bricks are exposed to heat and the elements for an extended period of time, they tend to crack, crumble, and break down more quickly than newer bricks.
One of the main reasons for this is that older bricks are often made from softer clay, making them more susceptible to damage. This deterioration can be further caused by poor construction and harsh weather conditions.
The most significant danger of a deteriorating chimney is that it can leak combustion byproducts, such as carbon monoxide (CO), into the home. This can occur when the chimney is damaged through cracks, gaps, or blockages. CO is a colorless, odorless gas that can cause a number of harmful side effects when inhaled.
Chimney deterioration can be slowed or prevented through regular inspections, proper maintenance, and timely repairs. When a homeowner prioritizes these things, they can extend the life of their chimney and prevent expensive, dangerous problems down the road.
Leaks
The mortar joints of the chimney deteriorate over time, and water penetrates the bricks to cause leaks. This can also lead to spalling, which causes the bricks to crumble and fall apart. This is a safety hazard and ruins the aesthetic of your home. Water leaks are also a major source of mold and other property damage. The best way to stop them is by identifying and addressing any leaks in your chimney system.
The most common leak is at the point where the chimney meets your roof. This area is a vulnerable spot, because rain can pour right into the gap between the chimney and the roof if the flashing isn’t properly sealed. Chimney flashing is typically made of aluminum and placed in between a few bricks to create a waterproof seal with the shingles or other roofing material. The flashing can also be secured with a tar or waterproof material, but these do not last forever and can break down or be washed away from the elements.
If you see water stains on the ceiling or walls near your fireplace, this is a clear sign that there is a leak in the chimney. This can lead to further deterioration of the masonry and damage to your fireplace components like dampers and fireboxes. It can also affect your health and safety by causing carbon monoxide leaks or leading to the rusting of the flue liner.
Chimney leaks can also lead to a “sponge effect,” where the masonry absorbs rainwater and holds it until it evaporates. This can damage the masonry and leave behind a white stain called efflorescence, which is caused by minerals in the water that have been left behind when it evaporates.